Frequently Asked Questions About Hardware

-
1. Barn Door Hardware
Can Barn Door hardware parts be sold separately?
Yes all components, including tracks, wheels, and hangers, can be purchased separately.
Can the “floor guide” be finished to match the black finish of the barn door hardware?
Unfortunately, this item is an unfinished piece and is meant to be hidden under the door.
What is the maximum door weight for Emtek Barn Door Hardware?
The wall or structure that your system will be mounted on must be designed to support a maximum door weight of 400 pounds.
Would thicker door comments be needed? Or what is the door thickness range for this product?
No comment is necessary on the order. Door thickness range is 1-3/8”-2-1/4”. No extension kits will be provided.
Can a customer order split-finish parts? (For example, a track in Stainless Steel finish with mounts in Flat Black finish)
Yes, split finish components can be ordered with Emtek’s Barn Door Hardware.
Note: Mount and wheel should be the same finish, as these parts are affixed together. -
2. Cabinet Hardware
What is the minimum order quantity for cabinet hardware?
There is no minimum order quantity.
Can I use your cabinet hardware on extra thick drawers/cabinets?
EMTEK® provides two sizes of screws with each knob or pull. For extra thick drawers or doors you can go to a local hardware store and purchase the same screw type with in a longer length.
Do the drop pulls have a rest or strike plate for the handle?
Yes there is a pin that provides a reset preventing the handle from damaging your cabinet face. -
3. Cleaning & Disinfecting
-
4. Deadbolts
Do you have extension kits for deadbolts on extra thick doors?
Yes, we offer extension kits for door thicknesses up to 3-3/8"
Can I convert a single cylinder deadbolt to a double cylinder deadbolt?
Yes, you will need to order an interior trim and a pair of cylinders for a double cylinder deadbolt.
Can I convert a double cylinder deadbolt to a single cylinder deadbolt?
Yes, you will need to order an inside trim and a new tailpiece or cylinder for a single cylinder deadbolt.
The thumb turn on the inside does not operate the latch.
1-Check the door thickness; it might be too thick causing the tailpiece to be too short. If this is the case an extension kit will fix the issue.
2-Check the tailpiece itself. Single cylinder tailpieces have breakaway marks and sometimes if there is too much drag on the bolt, the tailpiece could snap.
It's a little rough when I turn the key on my deadbolt.
This is probably due to a misalignment of the inside trim. If the inside trim is too high it will cause the tailpiece to tilt up at an angle, creating extra friction against the retainer pin.
I can insert my key and unlock the deadbolt, but when I turn the key back to remove it the deadbolt unlocks.
The deadbolt is installed incorrectly. Remove it from the door and re-install. Make sure you have the deadbolt latch in the unlocked position and that the tailpiece is in the horizontal position.
I'm installing my deadbolt and the cylinder is "bottoming out" on the latch.
There are a couple of possibilities:
1- The door may be too thin.
2- It is an alignment problem. If the latch is inserted and screwed to the edge of the door without taking alignment into consideration, the tailpiece may be tilted or off center, which will cause the deadbolt housing to hit the metal sleeve of the deadbolt latch.
*Keep in mind, once the deadbolt is installed, there is no way to look inside and see if the cylinder is bottoming out. -
5. Door and Appliance Pulls
Can 8" pulls be mounted back to back?
Most door and appliance pulls can be ordered and mounted in three configurations: through bolt, concealed surface and back to back. Be sure to specify the mounting option at the time the order is placed.
Can 18" and larger pulls be mounted back to back?
Yes, the 18" pulls are surface mounted with wood screws. Please make sure to check the door thickness. -
6. Door Preparations
Will a lockset fit my door?
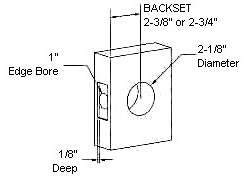
Emtek® locks fit into a standard American style tubular door prep. If you are replacing existing locks then your door preps will most likely be correct for Emtek® locks. Just determine the backset and you're ready to order. If you're installing locks in new doors that do not have a door prep please be aware that entry sets have varying requirements for hole location depending on the type of lock and design chosen. For this reason it is best to choose your lock and give it to the door prep person to assure holes are bored in the proper location. Some common door preps are shown below.
*Please refer to the templates for further detail.
PASSAGE, PRIVACY, KEY-IN-KNOB OR LEVER, AND DEADBOLT LOCKS fit into the door prep shown below. Bore a 2-1/8" hole through the door. The center of this hole should be located 2-3/8"or 2-3/4" back from the edge of the door (this is the backset dimension)
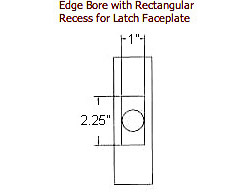
Bore a 1" hole in the edge of the door located on the centerline of the 2-1/8" hole. The latch will fit into the 1" hole. Chisel out a 1" by 2-1/4"rectangle on the edge of the door, 1/8"deep. The faceplate of your latch will sit in this recession.
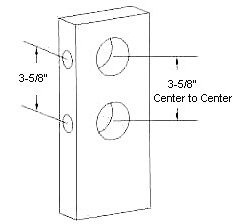
KEYED LOCKS WITH SIDEPLATES require two sets of holes with a center-to-center distance of 3-5/8" between the two sets of holes.
MOST TUBULAR HANDLESETS require a 5-1/2" center to center door prep.
*Please refer to the templates for further detail.
DUMMY SETS require no door prep. Dummy handles are surface mounted and may be located anywhere on the door you choose, but they are usually located to match the appearance of nearby operating locks. -
7. EMPowered™ Electronic Lock
What is the warranty on the EMPowered™ with Yale Access?
2 Years on Electronic, 5 years on Brass Finishes, Limited Lifetime on Mechanical.
Are split finishes available?
Yes, split finish is available on this item.
What style is the EMPowered™ Face plate?
The face plate will match the EMPowered™ finish and are square cornered ONLY.
What kind of latch and bolt is offered with the EMPowered™ with Yale Access lock?
The EMPowered™ latch is a special mechanical latch that is tapered to account for misaligned doors. The bolts for US15 and US26 are Silver while the bolts for US10B and US19 are Brass.
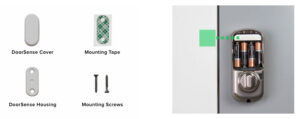
What comes with the “DoorSense” and how/where do I install/mount it?
DoorSense instructions are included in the Yale Access App installation setup and in your EMPowered package. DoorSense comes complete with the housing, cover, mounting tape, and mounting screws. This can be affixed to the door permanently with mounting screws, or with Mounting Tape. It should be mounted within 1.5 inches from the edge of your door frame, and should align with the lock’s Yale Access module horizontally.I bought the motorized version (E0101, or E0103)–but now I would like to convert into a smart lock. Can I do this?
Yes, all you would need to do is purchase our Works with Yale Access Smart Kit separately and install. em# SMARTMODULE-YA
Can I order the E0103 Motorized Entry System, or the E1103 Smart Entry System, but with a different handle set and thumbpress grip?
Yes, EMPowered™ comes standard with a Baden Grip, but you can change to any other sectional grip and thumbpress style.
My hardware set did not come with keys?
Yes, that is true – these sets are specially designed to include keyless access for, not only entering the home, but keeping track of who comes and goes via the Yale Access app.
My door thickness is 1 ½” - 2 ¼” thick – will these fit on my door?
For the DEADBOLT ONLY - Yes, it will fit this full range right out of the box. (E0101 & E1101) For the Keypad Entry Handlesets – please always specify if door thickness is above 1 ¾” thick door so screws and hardware of the proper length are sent for installation. (E0103 & E1103)
My door has weather stripping. Will this affect the installation, and/or integrity of the lock?
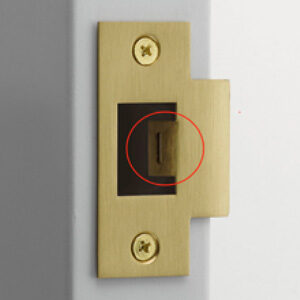
Weather stripping does not diminish the ability to install or use the lock. However, the installer will need to install the deadbolt AND the lever latch & strike so that the deadbolt moves freely. In other words, the lever latch holds the door in the correct position, so the deadbolt can operate freely. To achieve this, the installer may need to adjust the lever latch strike. He can loosen the lever latch strike screws and move the strike left-right. He can also bend the tab on the strike. (see image)
What is the maximum # of users that can be upgraded to an “Owner” status?
There is one (and only 1) master PIN code allotted during the setup of the Motorized Touchscreen Keypad Lock. There is one original digital key available in the app. On the EMPowered Smart with Yale Access Lockset, there is no limit to the number of users that can be set up as an “OWNER”. Just keep in mind that if additional users with “owner” level permissions also have the app, they have the ability to adjust all settings (including but not limited to adding and deleting new user codes, and adjusting all optional lock settings).
Is the EMPowered™ Smart Deadbolt or Smart Entry Set compatible with Z-wave functionality?
No--unfortunately, our new motorized version and smart version are not compatible with Z-wave technology at this time.
Is the EMPowered™ lockset tested for extreme temperatures (high & low), and if so, what are the ranges?
Yes, it has been tested for extreme high and low temperatures, see below:
High Temp Operation
The lock passes testing all the way up to 140° F (60° C). The lock works like normal. Low Temp Operation
Alkaline batteries stop working as the water-based electrolyte freezes. Therefore, the lock will lose power somewhere around 32° F (0° C). However, since the batteries are on the interior side of the door, they should not be subject to freezing temperatures.
If a customer buys multiple locks, does he need to connect all the bridges or just 1?
Each individual EMPowered™ lockset will need to have its own bridge. 3 locks = 3 bridges.
How much bandwidth is used by the EMPowered™ with Yale Access product?
Very minimal - Empowered™ uses less WiFi data than email.
Page 15 of the instruction sheet shows “Bluetooth capability.” Does this apply to the EMPowered products we are selling?
Yes, EMPowered™ with Yale Access (smart lock version) is a Bluetooth lock. The Yale Access hub “bridges” your Bluetooth lock to your home WiFi network.
When using the backup 9V battery to unlock from the outside of the door, should the battery actually connect to the exterior or just be “held” against the terminal? And in which direction should it be held to avoid reverse polarity?
The 9V battery will not “connect” to the bottom of the keypad – you just hold it in place to make contact. The connection is meant to be momentary, in case the owner accidently lets the batteries run completely down – and this is to be used as a “jump start” to let you enter a code to gain entry to the home. Please note: both the lock and the app give many warnings as the batteries get low. There is no need to worry about the 9V battery polarity. The lock will work fine regardless of which way you hold the 9V battery.
What is the recommended distance for the WiFi bridge to the router?
The max recommended distance is 10-15 feet. -
8. Hinges
How do I remove the hinge pin?
1) If the hinge has NRP's (Non Removable Pin) remove the setscrew.
2) The hinge pin is removed by tapping or pressing a punch or similar tool in the small hole at one end of the hinge. Once the pin is removed the hinge will separate into two pieces.
How do I attach the Decorative Tip Sets to Steel Hinges?
Thread one tip onto the hinge pin provided with the Tip Set. Insert bare end into the hinge and attach second decorative tip.
How do I attach the Decorative Tip Sets to Solid Brass Hinges?
Unscrew the cap from either end and replace with the Decorative Tips.
Do we have longer screws? Extra screws?
EMTEK® provides standard size screws with our hinges, we do have shorter screws on request for customers who are installing pre-hung doors with residential hinges only.
Which Decorative Tips go with these hinges?
Steel hinges use the tip sets with the threaded hinge pin. Solid brass hinges use the threaded tips which thread directly onto the hinge.
What size is the thread on your ball and steeple tips?
They are a metric thread, M8-1.25. The thread is the same on all sizes, although the heads are different sizes to coordinate with their respective hinge.
What does "extruded" mean?
Extruded means that the metal is not molded or stamped, it is heated to a high temperature to soften the metal enough to be pressed through a die and formed into the shape desired. -
9. Interconnect Device
What does the interconnect device do?
The interconnect device provides an emergency egress function on tubular handle sets. When the deadbolt is in the locked position, simply turning the knob or lever will open both latches. It is especially handy in a fire or many another panic situations.
Which locks are available with the interconnect device?
Any monolithic (one piece) handle set with a 5 ½" bore spacing, also keyed side plates with 5-1/2" center to center are available with an interconnect device. All sectional entry set plates are not available with an interconnect device.
Can I get an interconnect device on a decorative plate set?
Yes, interconnect device can be used on 5-1/2" center to center keyed side plates but not 3-5/8".
Can I order the interconnect device separately?
No, it must be installed on an interior trim in EMTEK® factory.
When I turn the inside knob the deadbolt latch doesn't retract.
This may be due to a couple of issues:
1)If the deadbolt mounting plate is not centered with the deadbolt thumb turn, the tailpiece activator on the inside of the thumb turn will grind against the deadbolt mounting plate, creating too much friction for the interconnect device. *The installer can adjust the mounting plate to reduce friction.
2) It may be due to a misalignment of the deadbolt latch with the deadbolt strike plate. This can be quickly tested by operating the interconnect device with the door open. If the latch glides freely with the door open, it could be an indication that this is the problem. -
10. Keyed Locksets
Can I order a split style or split finish, or both?
Yes, if both styles and finishes are be available in a keyed function. For example, you order an Egg knob on the outside and a Cortina lever on the inside because both handle styles are available in a keyed function.
Can I get a keyed lockset with a keyway on both sides?
No, the keyed locksets are designed only for single keyed function.
Can I use a Key in Handle(5100) with a sideplate?
No, the sideplate is not designed to accommodate any Keyed handle.
I can go out my door but I can't get back in.
Our keyed locksets have an emergency egress function, which allows a person to open the door from the inside without unlocking it. Therefore, the lock always opens from the inside. However, the lock stays locked unless somebody turns the thumb turn on the inside. Be careful to check the lock when leaving.
I've rekeyed the keyed lockset but I can't get the key to come out.
The knob or lever is installed wrong. Uninstall the knob or lever and re-install with the keyhole at the 6 o'clock position for knobs, 12 o'clock position for levers.
Levers:
Make sure that the release button is lined up with the release button hole on the lever.
Knobs
Make sure that the release button is lined up with the release button hole on the sleeve of the knob.
*A sure trick for proper assembly is to leave the key out when placing the knob/lever onto the shaft. Remove the key, place the knob/lever onto the shaft and slide it on as far as it will go. Once it stops, insert your key, turn it clockwise and slide the knob/lever on until it clicks. Sometimes, if the key is inserted and turned, it can create a timing problem, causing the lock to malfunction. This is a great way to ensure that the knob/lever is installed onto the shaft correctly.
I need to rekey it and I can't get the knob/lever to come off.
-Step 1: Loosen set screw on the bottom of the knob/lever.
-Step 2: Turn the key 90° to the horizontal position.
-Step 3: Insert a pin or paperclip into the hole on the stem of the knob and press the release button.
*A knob needs to be pressed together. It helps to use a counter top or table to lean against, placing the rosette on the edge and pushing on the knob while inserting the pin/paperclip, etc. -
11. Materials and Finishes
What's the best way to clean your hardware?
*Never use any chemicals on any of our hardware. Just use warm water with a little mild soap, such as dish soap.
Brass:
Brass polishes contain abrasives that will scratch through the lacquer. This exposes the finish to oxygen, which causes oxidation, leading to tarnish on brass or bronze. Once oxidation starts, it will spread even under the lacquer. Also, it is important to note that even common cleaning liquids, such as Windex or other ammoniated products will remove the lacquer finish.
Bronze:
To extend the life of bronze patina finishes, it is recommended to use a soft wax, such as Johnson Paste Wax or a soft car wax. Done regularly, this will decrease friction against the finish and should keep it looking good for a long time.
Wrought Steel:
Use only warm water with mild soap if possible. Flat Black and Satin Steel are powder coat finishes.
Can I get a steel handle set in a bronze patina finish, or vice versa? Can I get it in US10B?
No. Steel finishes cannot be applied to non-steel surfaces, just as brass finishes cannot be applied to non-brass finishes. Same goes for Bronze Patina finishes, there is no crossing over.
What finish is best to use near the ocean?
All of our finishes have been tested with salt spray for over 1000 hours and perform very well. Among the best performers in salty environments are Chrome and PVD.
What do you mean by "lost wax"?
Lost wax an ancient process in which a bronze sculpture (in our case door hardware) is cast from a wax model. During the process wax model is melted out of the mould (lost wax), and a bronze cast item is produced.
How do you create the dimples in Sandcast Bronze hardware.
By dropping irregular bits of sand into the mould.
Are EMTEK® products "green?"
The copper used in our brass and bronze products come from recycled sources.
Our packaging is all biodegradable or recyclable using only paper based products. -
12. Mortise Entry Sets
How do I remove the threaded cylinder?
Please follow these steps:
1) Remove the decorative faceplate from the edge of the door.
2) Loosen the cylinder lock screw, about 5-10 turns. Do not remove completely.
*Cylinder lock screw is located just under the faceplate screw
3) Insert the key halfway into the cylinder and turn counter-clockwise.
*Recommendations after cylinders removal:
If you have an Emtek® key blank or a Schlage key, it is recommended to re-key.
Be careful not to break the key.
There is a slotted disk on the inside of the box, directly in front of the cylinder. Sometimes, if unthreading is difficult, it may be helpful to insert a screwdriver and unthread the disk slightly.
Tighten the cylinder lock screw when replacing the cylinder.
Every time I lock the door, the thumb press automatically locks.
Yes, any time you lock the door, from either outside or inside, the thumb press will lock automatically. If you unlock the door, the thumb press will remain locked until you depress the button on the edge of the door. This is normal operation and cannot be changed. Therefore, when you leave, be careful not to lock yourself out. Be sure to leave the door ajar or depress the button.
I can't unlock the door from the outside. I turn the key and the deadbolt unlocks, but the thumb press won't depress.
The thumb press will not depress while you are trying to unlock from outside.
To open the door please turn the key clockwise past the point when you hear the deadbolt unlock, then keep turning the key and it will pull back the latch bolt.
*The thumb press will not depress unless the lock is in passage mode (activated by the buttons on the side)
The deadbolt thumb turn won't turn.
Make sure that the thumb turn spindle is straight. If the inside trim is crooked or off-center that could be the problem. Try loosening the screws and adjusting the position of the plate.
When the door is locked, I turn the inside knob and the deadbolt only slides back partway.
This may be due to a few issues:
1) It could be that the holes in the decorative faceplate are too small, creating friction on the bolt. Grinding or filing of the holes may be required. Please note that due to the hand made nature of our mortise lock boxes, each faceplate is tested, fitted, and filed to fit the particular mortise box with which it is shipped.
2) It could be due to a jam inside of the mortise box. This tends to be a problem more often on the 2 ¾ backset box. If the box was "tested" by the installer, and was operated without having the cylinder installed, this can cause the cylinder link to slide up, under the cylinder lock screw, creating a jam. If this is the case they may be able to fix it by removing the cylinder and using a small screwdriver to move the cylinder link. Sometimes just removing the cylinder will work, or even taking the box out of the door, and shaking it with the face plate pointing up. *Please make a note that it is best not to try to test the box without installing the cylinder first.
3) It could be a misalignment of the inside trim. If the inside trim is too high, low, or off-centered in any way, it can cause the thumb turn spindle to sit at an angle, thereby creating excess tension on the spindle, and the deadbolt will not be able to turn smoothly and freely.
4) This could also be due to the plate on the side of the mortise lock body. All doors have a beveled edge. The plate on the box can be moved to accommodate these bevels by loosening the screws on the top and bottom of the box. If the plate is too crooked it may grind against the deadbolt creating excessive drag. Try removing the trim, removing the box and adjusting the plate. Then re-install. -
13. Multi Point Hardware
Why do the screw holes on your trim not line-up with those on my door?
Some products may need to be retro-fitted to the door to align with existing hardware.
Will re-drilling my door void the door manufacturer’s warranty?
Please confirm with the manufacturer of door(s).
Why are there no strike plates or latches included with my multipoint trim set?
Emtek only offers the inside and outside trim with the lever attached, and the required cylinder. In most cases, you will need to use the existing strike for the original door, or contact the door manufacturer for different finish options.
Can knobs be used instead of levers on multipoint trim sets?
Knobs can only be used in Multi Point with authorized approval by upper management. This may also be dependent on conditions and requirements in the geographic area of the home.
Does EMTEK manufacture escutcheon plates and levers for sliding patio doors?
Not at this time.
Are installation instruction sent with the shipment?
Our Multipoint brochure is a great reference tool, but there currently no instructions.
How do you key the Euro Cylinder?
You would need to remove the set screw at the bottom of the cylinder to proceed with keying.
What is the maximum door thickness for hardware?
The maximum door thickness for Multi Point Hardware is 2 ¾”.
What finishes are available for cylinders?
Euro cylinders are only available in 3 finishes but the thumb turns are available in all finishes offered.
Regular cylinders are available only in 3 finishes, but the cylinder housings are available in all finishes.
Are levers for Multi Point spring-loaded?
Yes, all EMTEK Multipoint trims are spring loaded.
Can a Euro cylinder have a Weiser keyway?
No, currently a Euro Cylinder can only use a Schlage keyway.
Can two different plate style be used? For example, you might select the 1 ½” x 11” plates for the outside, and for inside, the 2”x 10” plates.
Yes, this can be done—however, both plates must be the same configuration. Default pricing would be the higher of the two prices if there is a price difference between plates. -
14. Sideplate Locks
What is the bore spacing on a keyed sideplate?
We offer two sizes depending on style; 3-5/8" and 5-1/2" center to center.
Can I order a passage or privacy sideplate set with the handle at the top instead of the bottom (or vise versa)?
EMTEK® side plates are designed traditionally with the handle at the bottom. The customer can also choose to set the handle at the top of the side plate.
Do I need handing on a sideplate with a lever?
Handing is required. -
15. Tubular Entry Sets
Do you have extension kits for extra thick doors?
Yes. Depending on the style of the lock and the thickness of the door, some items will have to be modified in our factory.
*Please refer to the technical specifications for further detail.
How do I remove the knob/lever?
You are not advised to remove the knob or lever. Doing so may result in denial of warranty. The knob/lever is spring-loaded to the plate and held on with washers and e-clips or snap rings.
*If you are having trouble tightening the screws near the knob, see below.
How do I tighten the screws near the knob?
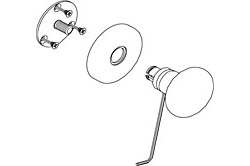
Try to insert and tighten the screws by hand then use an "L" shaped screwdriver.
We recommend protecting the knob with a rag or thick plastic bag.
How come my knob/lever wiggle?
Make sure the you have tightened the setscrew on the stem of the knob/lever. The setscrew does not hold the knob/lever onto the trim plate, but it does tighten the knob/lever onto the spindle.
What if my bores are too big? (Diameter larger than 2 1/8")
It might be time to purchase a new door.
Do dummy handle sets require boring?
Yes. The dummy handle still has the bell housing on it, and the deadbolt still requires through-bore mounting. It is the same prep as the active, but no edge prep is necessary.
What do I need to make a double cylinder into a single cylinder?
You will need:
An interior trim for a single cylinder, either the whole thing for a monolithic plate or the inside deadbolt trim for a sectional.
A new tailpiece for the outside cylinder. Single cylinder tailpieces are long, flat, straight and narrow to go all the way through the door. Double cylinder tailpieces are forked and shorter, to meet in the middle. A double cylinder tailpiece will not work for a single cylinder application.
What do I need to make a single cylinder into a double cylinder? You will need: An interior trim for a double cylinder, either the whole thing for a monolithic plate or the inside deadbolt trim for a sectional. A new tailpiece for the outside cylinder. Double cylinder tailpieces are forked and shorter, to meet in the middle. Single cylinder tailpieces are long, flat, straight and narrow to go all the way through the door. A single cylinder tailpiece will not work for a double cylinder application. How close together can I get the sectionals to go?
See the dimension page for that particular handle set in the reference manual. Take the height of the top trim, and the height of the trim plate around the thumb press, divide each number by 2 and add them together.
This will be the minimum bore spacing. The minimum means that the plates will be touching, and you should allow for at least 0.25" clearance.
For Example:
Lets' take Knoxville handle set
The outside deadbolt trim is 3.625" high.
The trim around the thumb press is 4.5" high.
3.625 ÷ 2 = 1.8125
4.5 ÷ 2 = 2.25
1.8125 + 2.25 = 4.0625
4.0625", approximately 4 1/16" is the minimum bore spacing. At that spacing they would be touching. You should bore their door at a minimum of 4 5/16".
The outside thumb press spindle won't engage with the latch, it's crooked.
The spindle is what we call pre-loaded. It sits at an angle on purpose so that once installed, there will already be tension in the thumb press, keeping it tight and rattle free.
To install it: while pushing the outside trim onto the door, stick a screwdriver into the spindle hole of the latch from the inside and turn backwards. Once it engages, remove the screwdriver and continue mounting the handle set.
The outside thumb press spindle is too short.
The outside thumb press spindle on most handle sets with reach up to 2".
If the handle set needs a longer spindle for the outside thumb press, you will need to re-order the handle set and specify that you need it built for the thickness of your door.
When I put my key in the cylinder it just spins, it won't retract the deadbolt.
This is probably due to the cap retainer pin on the back of the cylinder. If the cap retainer pin is lost or broken it will not catch the deadbolt.
It could also be that the tailpiece is broken, either at the end fitting into the thumb turn, or the end under the cylinder cap. Sometimes the cam will break off. If that is the case we will send you a new cylinder and advise you to check the alignment of the strike plate with the latch. If the alignment is off, this could cause excess friction on the latch, and excess tension on the interior components, resulting in breakage.
How come the deadbolt only works with the key in it?
You may have installed it incorrectly. Remove the handle set from the door and re-install. Make sure that when you install it, the deadbolt latch is unlocked, and that the tailpiece is in the horizontal position. Installing the tailpiece in any other fashion may cause a malfunction.

